Git is probably the most popular version control system nowadays. It has a lot of features that makes it suitable for many different workflows, even difficult ones. Maybe one of the most useful feature of Git is the ability to rewrite history, because this makes it possible to fix our mistakes in elegant ways – no need for “revert commits” and other stuff like that.
What is rebase?
git rebase is one of the most powerful commands Git offers. Reading the official documentation may not give enough insight about the usage and the possibilities it opens. This explanation helps in understanding the feature, but the best way to learn something is to try it. The purpose of this blog post is to show a few common scenarios where rebase can help. In addition, I will use Android Studio‘s Git integration for the demonstration.
Git integration of the Studio
I think that Android Studio – and the IntelliJ platform, the base of the Studio – makes a great job in integrating the Git VCS. The VCS roots can be configured in the File / Settings menu, under the Version Control section if they are not detected automatically:
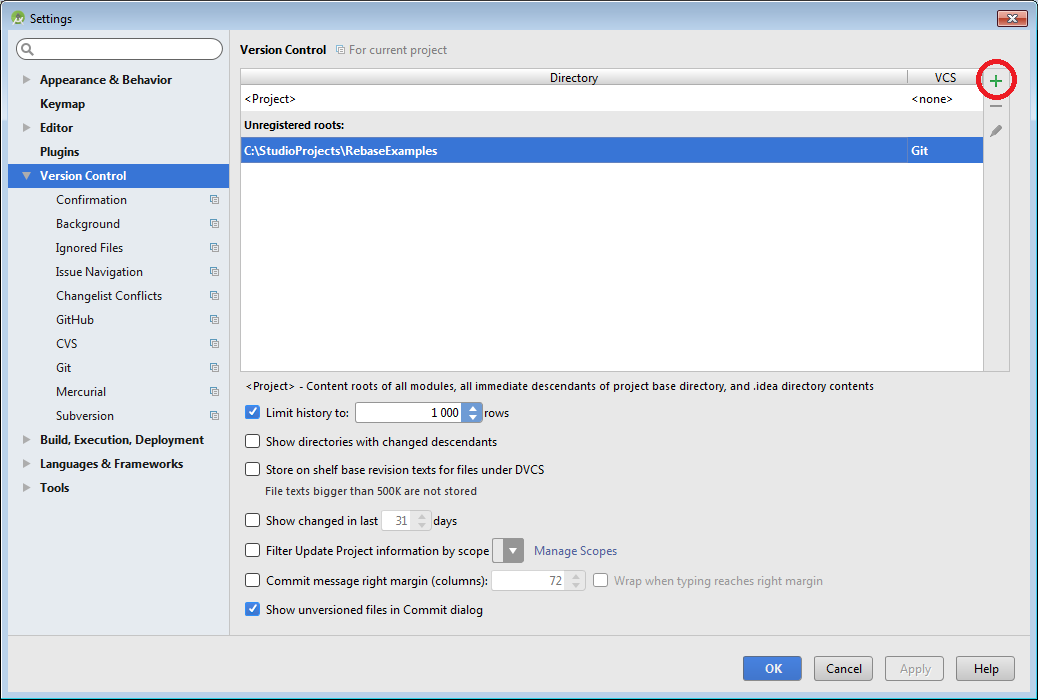
VCS Configuration
If the configuration is correct, the Git branch selector appears somewhere in the bottom right corner of Android Studio’s window. In the Version Control tool window, the Console tab can be used to see the actual Git commands that are executed. This view is very useful because sometimes the names of the UI actions are not correlated to the similar or identical names in the Git terminology – for example, choosing “Rebase onto” will not pass the --onto switch to the rebase command.
Before we take a look at the rebase use cases, I would like to point out two things. The first one is the golden rule of rebasing:
Never rebase shared branches!
This rule is important, because rebase rewrites history. If done on a shared branch, history of others may get changed unexpectedly, resulting in confusing situations – and duplicate commits as soon as others execute their next pull.
The second thing to consider is that rebasing will create new commits instead of the old ones. Because of this, git will reject push after a rebase happened on a branch that is already on the remote. It will even give an advice to merge the remote branch. Do NOT do this, ever! Merging after a rebase will merge the commits from the remote to our local branch, which is the opposite of what we wanted to achieve with the rebase. Because of this, merge will result in duplicate commits. The correct way in this case is to use force push by specifying the -f switch to the push command.
In Android Studio, force push is disabled by default, but it can easily be enabled with a few clicks from the VCS / Git / Push window.
Incorporating changes from another branch
This is probably the most simple and most common use case for rebase. Lets’s say that we branch off from the master branch and work on a new branch called feature1. We create a commit (“Feature 1 commit 1.”). Meanwhile, someone pushes a new commit to the master branch (“New commit for the master branch.”). We realize that we need that new master commit on our branch. What can we do?
First, if the master branch is used by multiple people, then always run a fetch to see the most recent state of the remote master branch. In Android Studio, this can be done by choosing the following menu: VCS / Git / Fetch. After this, normally we would execute the following git command, while being on our feature1 branch:
git rebase origin/master
In the Studio, Rebase onto has to be chosen from the remote branch’s menu item:
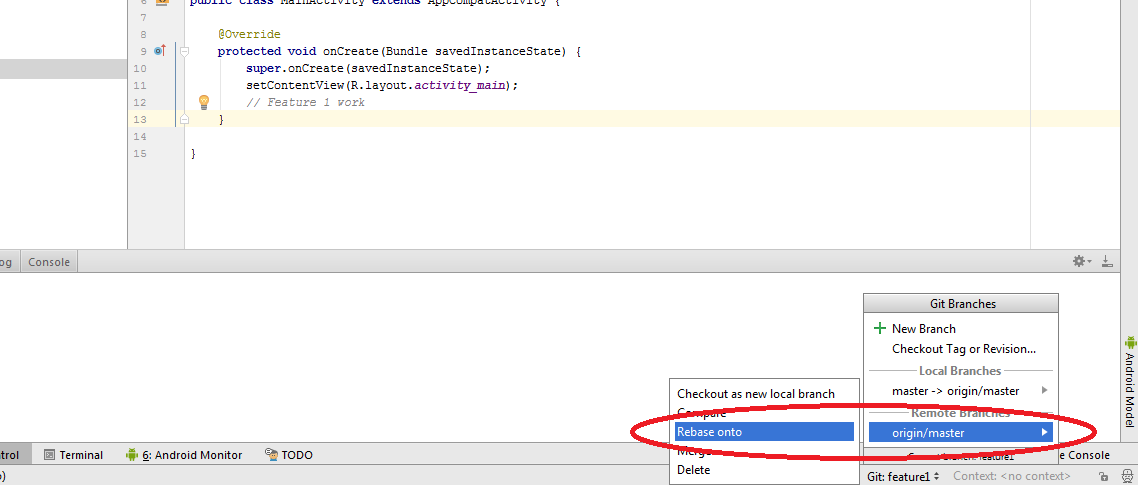
Incorporating changes from “origin/master”
It is possible that conflicts will appear, they have to be resolved before the rebase can succeed. The result can be seen by comparing the pre-rebase and post-rebase history:

Log before rebase

Conflict resolution
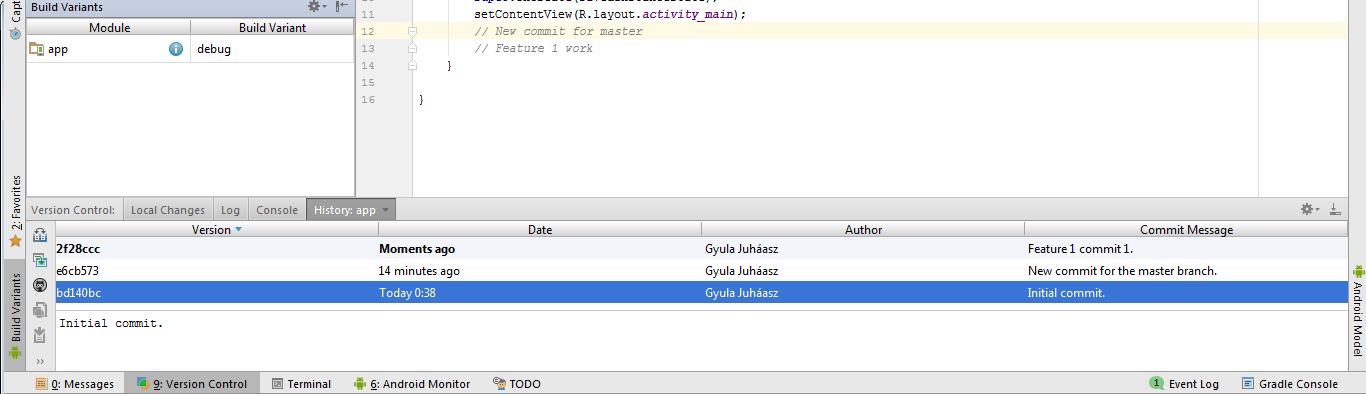
Log after rebase
After the rebase, feature1 branch has to be pushed to the remote. If it already was on the remote before the rebasing, force push has to be used, otherwise a plain push should be enough.
Correcting commit messages
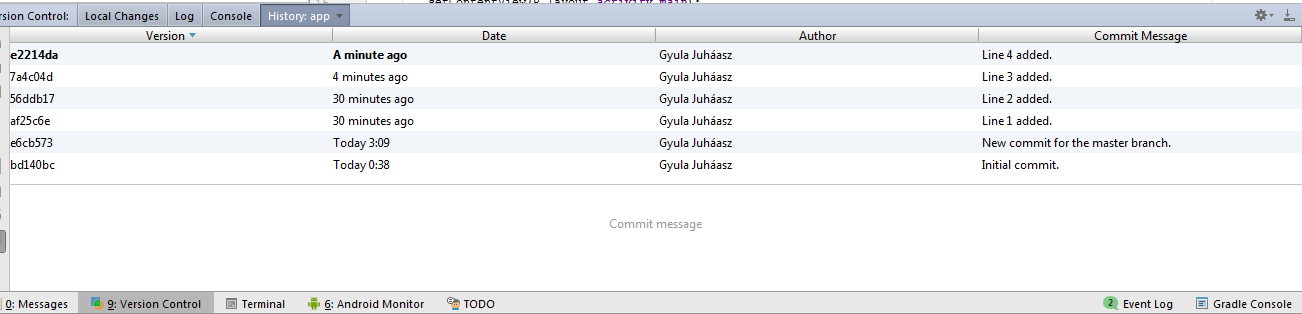
A frequent mistake is putting typos in the commit messages. These typos can easily be fixed with interactive rebase. In the following example, I worked on a branch named feature2. There are 4 new commits on the branch, and each one was supposed to add one new line to the code. Here is the history of the branch after all of the commits have been created:

Typo in commit message
Carefully checking the above screenshot will reveal the typo in one of the commit messages: “Lnie 3 added”. From command line, we would start an interactive rebase this way:
git rebase -i HEAD~2
A little explanation: the -i switch tells Git that we want an interactive rebase. HEAD~2 decides which commit the rebase should be started at. HEAD represents the tip of our branch, and the ~ operator means the first ancestor of the commit, so HEAD~2 tells Git to start the interactive rebase with the commit before the last commit.
From Android Studio, the same can be achieved, relatively easily. VCS / Git / Rebase is the menu item that has to be chosen and it will show the following dialog:

Interactive rebase
The meaning of Git Root and Branch is straight-forward to find out. The interesting part is the Onto field. This has to be the first commit that we would like to see in interactive rebase. In the example above, this would be HEAD~2. After clicking Start rebasing, the Studio will present us another window where we can decide the faith of the commits:

Interactive rebase
As seen on the screenshot, the last two commits can be adjusted. Reword means changing the commit message and pick means keeping the commit without any changes in it. After every commit is set to the desired value, the rebase can be started. This time, we will receive the last popup where the new commit message can be decided:

Editing the commit message
After correcting the commit message, Resume Rebasing has to be chosen. When the rebase finished, we can check the history if it is correct now:
The log after rewording
After the commit message is fixed, the same applies that was written for the previous section: if the branch is already present on the remote, it has to be force pushed, otherwise a simple push should be enough.
Editing the commit
Continuing with the previous example, we can notice that the content of the second commit is wrong:
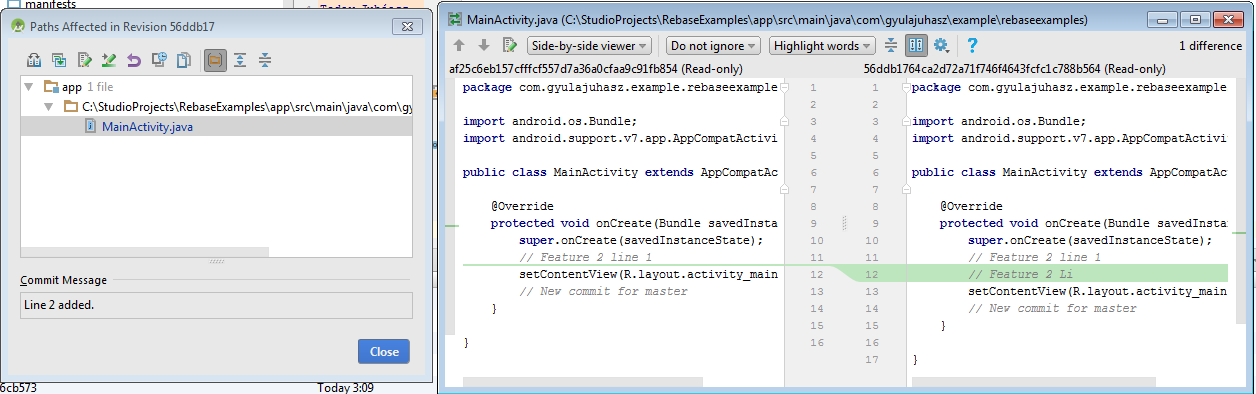
Commit with wrong content
This can be fixed with the same method that was used in the previous example with only two little differences. The first one is that the starting commit will be HEAD~3 now, since that commit contains the wrong modifications. The following screenshot shows the starting configuration for the rebase:
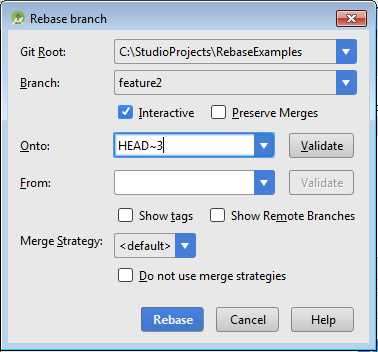
Rebase configuration
After starting the rebase, it is time to reveal the second difference: instead of reword, the wrong commit will changed to edit in the rebase process:
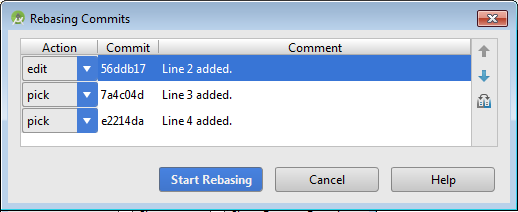
Editing the commit
The rebase process will stop at the commit that will be edited. At that point, new changes can be made that will be added to the commit. The most important step is to Add the changes to Git as shown in the screenshot below:
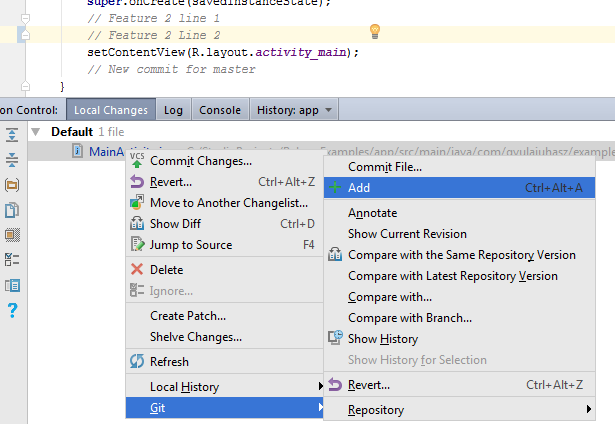
Adding new changes to the commit
When we are finished with the new changes, the rebase process can be continued by VCS / Git / Continue Rebasing:
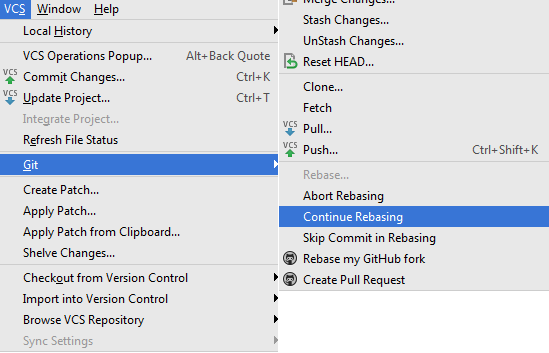
Continuing the rebase
If everything goes well, the rebase should now finish automatically. The only interaction that may be needed is deciding the commit message for the edited commit.
Reducing the number of commits
Interactive rebase has an operation for commits called squash. Squashing can help to make a feature branch cleaner before it is merged back to the respective development branch. Squash melts a commit to its parent commit.
Still working with the previous example, there are 4 commits on feature2 branch. It would be nice if only one commit remained, so it is time to squash the commits.
The process is very similar to the previous rebases, but this time we start from HEAD~4. The approach is to pick the first commit and choose squash for the 3 subsequent commits. The following screenshot shows the relevant information:
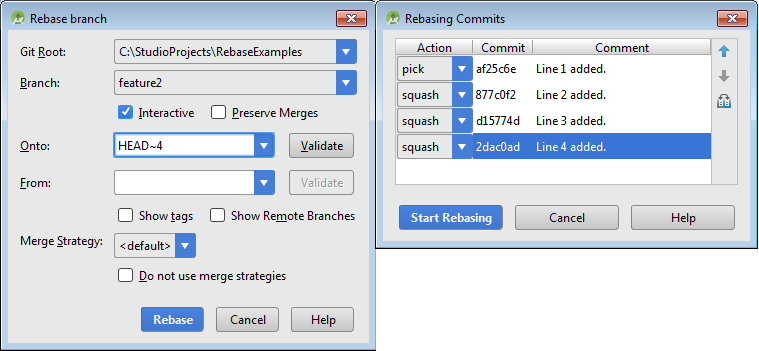
Squashing the commits
Android Studio will pause once to ask for a final commit message for the squash commits. To help us, it shows the messages of the currently squashed commits. In the example, I chose “Lines added” as the message of the new commit:
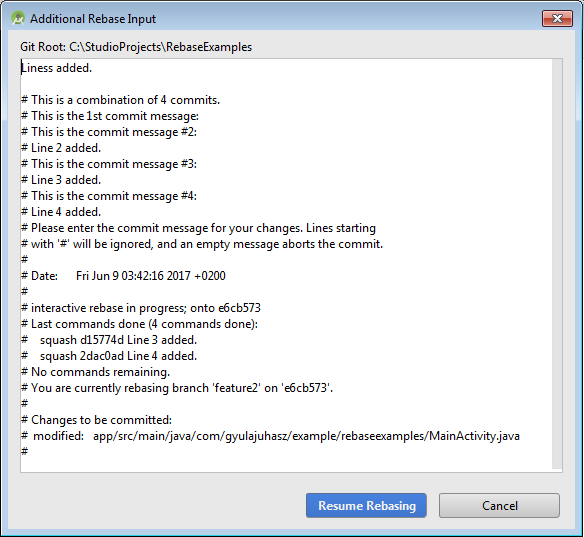
Final commit message
After the rebase is finished, the result can be checked by looking at the history of the branch:
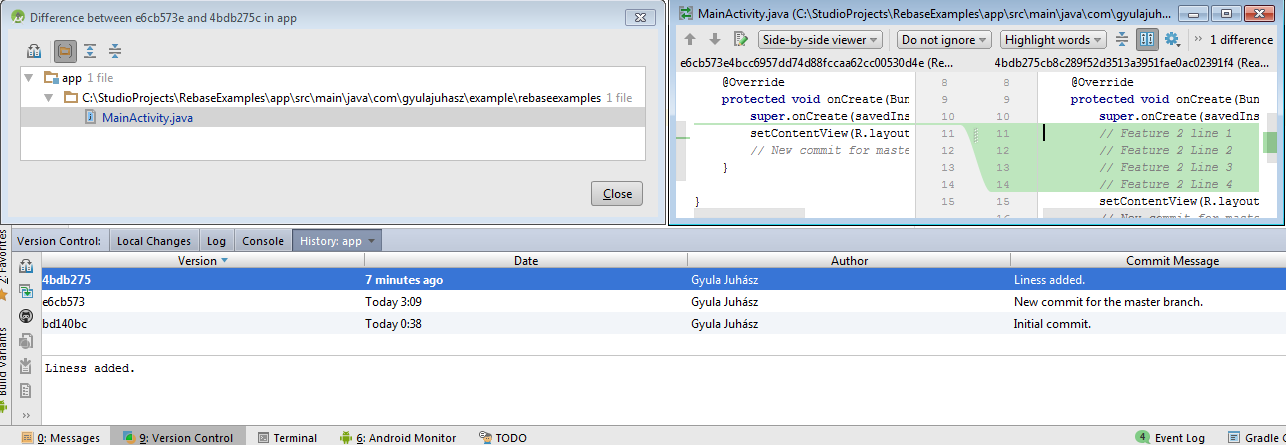
Result of squash
Conclusion
I hope that these little examples help in understanding the different aspects of Git rebase and give a little routine in using Git from Android Studio. In my opinion, Android developers are lucky to have this level of integration in their IDE.
FARRUKH NAJMI
June 18, 2019 — 1:58 pm
Tip: For squash commits use case, if you have a large number of commits then you want o squash (typically all but the first one in list) then you can multi-select those commits (holding CTRL key while clicking to select on windows). Then use right mouse click to choose Squash and you can update all the selected commits in one step instead of individually doing it for each.